You can use differentiation tags to assign specific content to customized sets of students, which are not visible to students.
A Canvas admin needs to enable the Differentiation Tags setting at the account or sub-account level. Admins can also access differentiation tags through Canvas Data for reporting and analysis.
Notes:
- The Differentiation tags setting must be enabled at the account level.
- Differentiation tags are not retained during course exports or imports.
- Each course is limited to 40 tags total and 10 variants per tag set.
- There is no limit to the total number of tags a student can have.
- By default, a student can be assigned multiple tags; however, if a Tag Set is configured as 'Single Tag,' a student can only be assigned one tag from that specific set.
View the video transcript
00:05: How do I create and manage Differentiation Tags as an instructor?
00:09: In Course Navigation, click the People link.
00:13: In the People page of a course, click the Manage Tags button. If you have not created tags yet, an introductory message displays in the Manage Tags tray.
00:25: To create a tag, click Get Started button.
00:29: To import tags, click the Upload CSV link.
00:33: In the Create tag window, enter a tag name and a tag set. Then, click the Save button.
00:41: If you previously created tags, the Manage Tags tray displays a list of existing tags.
00:47: To add a new tag, click the Add Tag button.
00:52: To edit a tag, click the Edit icon.
00:55: To import tags, click the Upload CSV button.
01:00: To delete a tag, click the Delete icon.
01:04: When editing a differentiation tag, you can change from a single tag to multiple tags and vice versa. You can also change the Tag Name.
01:13: If you selected multiple tags, you can add or edit the tag set name and add another tag.
01:20: To apply the changes, click the save button.
01:23: In the import tags tray, you can download a tag template file.
01:28: To learn more about import instructions. Click the red tag. Import instructions link.
01:34: To import tags drag and drop a file or click the red tags or choose a file to upload link.
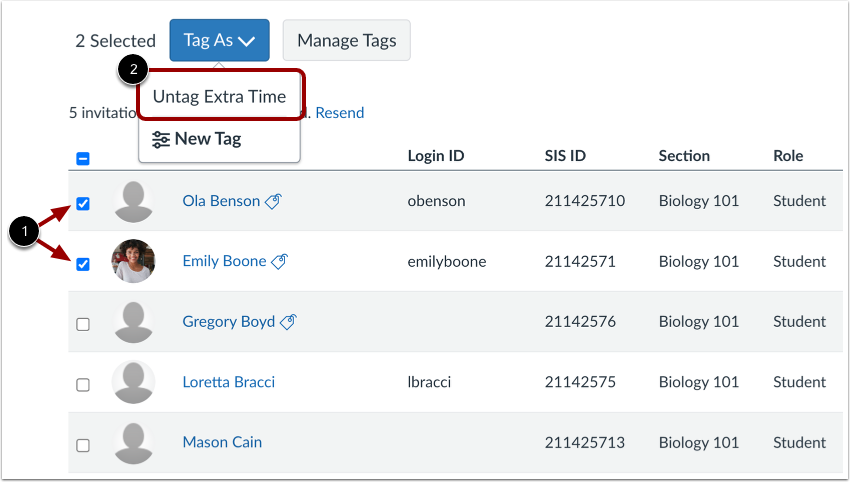
01:41: To filter by roles and differentiation tags, click the Role drop-down menu. To add tags to students, click the checkbox of the desired student(s). Then, click the Tag As button. You can either select an existing tag or create a new tag.
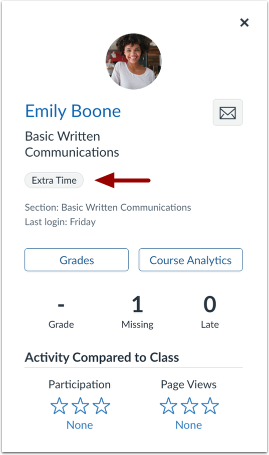
01:58: Once a tag is assigned to a student, a tag icon displays. To view the assigned tags, click the icon.
02:05: All tags assigned to a student display in a modal.
02:09: You can also view student tags in the Student Details tray.
02:14: To bulk untag students, select the students with the same tag you wish to remove. Then, select the Untag option.
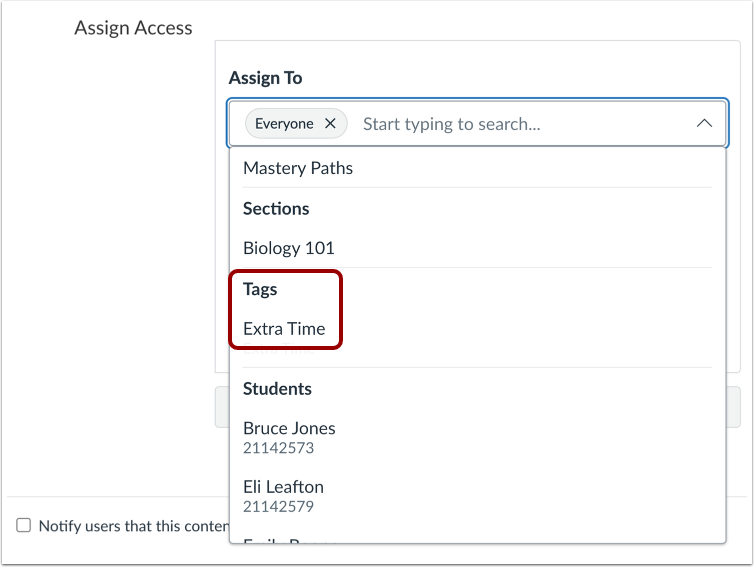
02:22: When creating or editing Assignments, Discussions, Quizzes, New Quizzes, or Pages, you can assign items to students with specific tags.
02:32: Assignments assigned to tags display as Tag(s) in the For column instead of Groups.
02:38: This guide covered how to create and manage Differentiation Tags as an instructor.
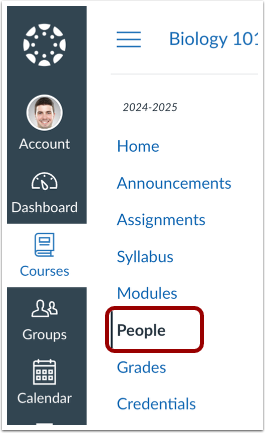
Open People
In Course Navigation, click the People link.
Create Tag
In the People page of a course, click the Manage Tags button [1]. If you have not created tags yet, an introductory message displays in the Manage Tags tray.
To create a tag, click the Get Started button [2].
To import tags, click the Upload CSV link [3].
Note: Due to permission caching, changes may take up to an hour to appear unless a users cache is manually cleared in Canvas.
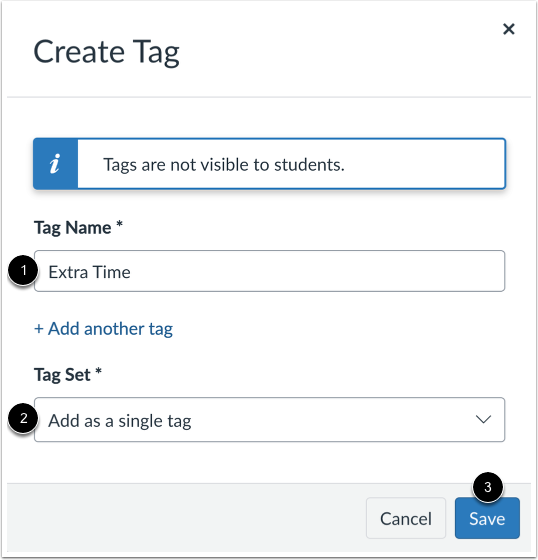
In the Create Tag window, enter a tag name [1] and a tag set [2]. Then, click the Save button [3].
Manage Tags
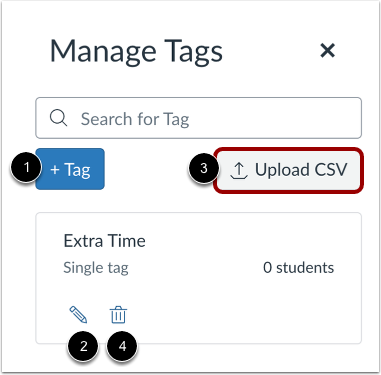
If you previously created tags, the Manage Tags tray displays a list of existing tags.
To add a new tag, click the Add Tag button [1].
To edit a tag, click the Edit icon [2].
To import tags, click the Upload CSV button [3].
To delete a tag, click the Delete icon [4].
When editing a differentiation tag, you can change from a single tag to multiple tags and vice versa [1]. You can also change the Tag Name [2].
If you selected Multiple Tags, you can add or edit the Tag Set Name [3] and add another tag [4].
To apply the changes, click the Save button [5].
Notes:
- Choose Single Tag if students should belong to only one category in this set (e.g., specific project groups).
- Choose Multiple Tags if students may need several attributes from the same set (e.g., various learning accommodations).
In the Import Tags tray, you can download a tag template file [1].
To learn more about import instructions, click the Read Tag Import Instructions link [2].
To import tags, drag and drop a file or click the Or choose a file to upload link [3].
Assign Tag As
To filter by roles and differentiation tags, click the Role drop-down menu [1]. To add tags to students, click the checkbox of the desired student(s) [2]. Then, click the Tag As button [3]. You can either select an existing tag [4] or create a new tag [5].
Once a tag is assigned to a student, a tag icon displays. To view the assigned tags, click the icon [6].
Notes:
- Creating a new tag using the Tag As button does not automatically apply the tag to previously selected users. Additionally, you can bulk select users via Shift+Click.
- Differentiation Tags can only be applied to users with the Student role. They cannot be assigned to Instructors, TAs, or Designers.
View Student Tag
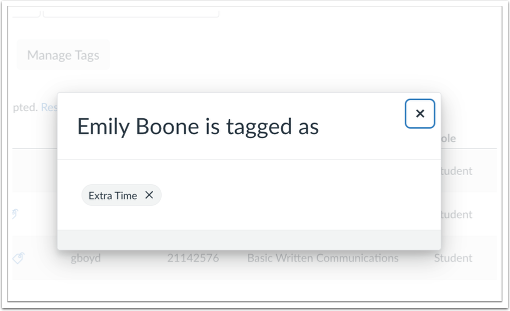
All tags assigned to a student display in a modal.
Note: Students can have multiple tags across different sets. If you find you cannot assign more than one tag from a specific set, check the Tag Set settings to ensure it is not restricted to the 'Single Tag' configuration.
You can also view student tags in the Student Details tray.
Bulk Untag
To bulk untag students, select the students with the same tag you wish to remove [1]. Then, select the Untag option [2].
Note: Only one tag can be removed at a time.
View Assign To
When creating or editing Assignments, Discussions, Quizzes, New Quizzes, or Pages, you can assign items to students with specific tags.
Note: To verify the number of students in a tag group before assigning work, go to the People page and use the Search Student dropdown to filter by tag. The resulting list will show exactly which students will receive the assignment.
Assignments assigned to tags display as Tag(s) in the For column instead of Groups.
Notes:
- For more information, visit the Order of Precedence and Due Dates for Assignments and Modules resource document.
- When a student belongs to multiple tags or sections with conflicting due dates for the same assignment, the assignment with the latest due date applies. However, if there's an individual override set for the student, that due date will take precedence over all others.
- Differentiation Tags are supported for Group Assignments and can be assigned when creating a group assignment.