00:07: How do I use the Conferences interface as a moderator or presenter?
00:12: The Conferences interface contains a variety of tools to help you moderate
00:16: and participate in your presentation.
00:18: The interface consists of the following areas: User Menu, Presentation
00:23: Window, Conference Tools, Options Menu
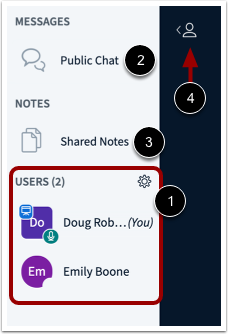
00:26: From the user menu, you can view all the users in the conference.
00:30: Each user is represented by their display name in canvas.
00:35: You can also chat with conference, participants and contribute to Shared
00:39: notes,
00:41: To open the conference chat, click the Public Chat link.
00:45: To open the Shared Notes, click the Shared Notes link.
00:49: The User Menu is open by default. To close the User Menu, click
00:53: the Users icon.
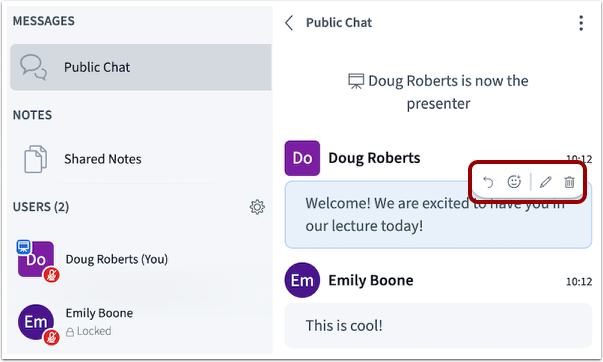
00:55: You can reply to, react to, edit, or delete individual student messages.
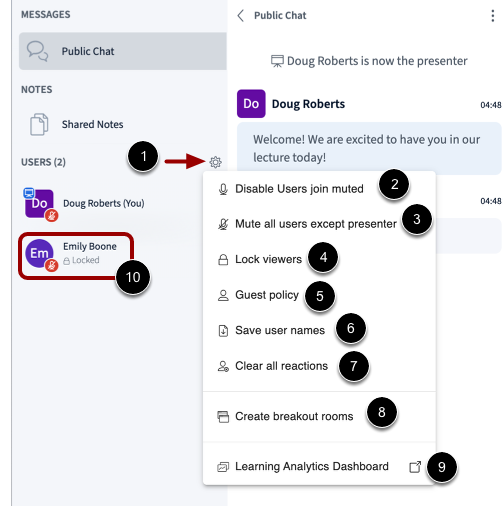
01:01: To manage settings for all users, click the User Settings icon.
01:06: To disable users from joining with audio,
01:08: click the Disable Users join muted link.
01:12: To mute users, click the Mute all users except presenter link.
01:17: To lock specific conference features for users,
01:19: click the Lock viewers link.
01:22: To allow or disallow guest to join the meeting, click the Guest policy
01:26: link.
01:27: To save user names, click the Save user names link.
01:32: To clear all reactions, click the Clear
01:34: all reactions link.
01:36: To create breakout rooms, click the Create breakout rooms link.
01:41: To collect and display data about participants' engagement,
01:44: click the Learning Analytics Dashboard link.
01:48: To chat with a user, remove a user from the conference, or promote a
01:52: user to presenter or moderator, click the name of the user
01:57: The Presentation Window displays the presentation that has been selected by a
02:01: moderator or presenter. To upload a new presentation file, start
02:05: a poll, or share an external video, click the Add button.
02:09: To view the session details click the session title. To begin recording
02:14: the session, click the Start recording button.
02:17: The Presentation Window also includes several tools that control how you can
02:22: participate in the conference. To Mute or Unmute
02:25: your microphone, click the microphone button. To enable your webcam, click
02:29: the Share webcam button.
02:32: To share your computer screen, click the Share your screen button.
02:35: If webcams are enabled, you can close the presentation window and
02:39: display only webcams by clicking the Minimize presentation icon.
02:44: To show reactions, click the Share a reaction button. To signal
02:49: that you want to speak or ask a question, click the Raise your hand button.
02:54: To allow all users to use the annotation tools,
02:56: click the Turn multi-user whiteboard on icon.
03:01: The leave button enables you to Leave session and additionally, for moderators,
03:05: to End session to all.
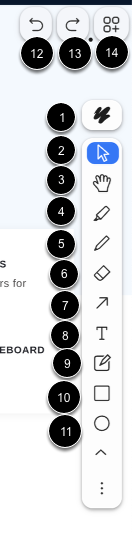
03:08: The Conferences interface includes several tools that you can use to annotate
03:12: the presentation window. If an annotation is added to your presentation,
03:17: you can select the thickness and color of text,
03:20: click the Styles.
03:22: To 0.2 or indicate specific parts of an image.
03:25: Click the select.
03:28: To pan a document zoom in or zoom out, click the Hand icon.
03:33: To emphasize or mark certain parts of an image or text,
03:36: click the Highlight.
03:38: To use a pencil to draw in the presentation window,
03:41: click the Draw icon. To remove, click the Eraser
03:45: icon.
03:46: To remove, click the Eraser icon.
03:50: To draw or place arrows on an image or document,
03:53: click Arrow icon.
03:55: To add text, click the Text icon.
03:59: To create a note, click Note.
04:02: To draw a rectangle around an area of focus,
04:05: click the Rectangle icon.
04:08: To draw an ellipse shape for emphasis or annotation,
04:11: click the Ellipse icon.
04:14: To undo the most recent annotation, click the Undo icon, to
04:18: restore an action that was previously undone,
04:20: click the Redo icon.
04:23: To hide or minimize the toolbars, click the Options icon.
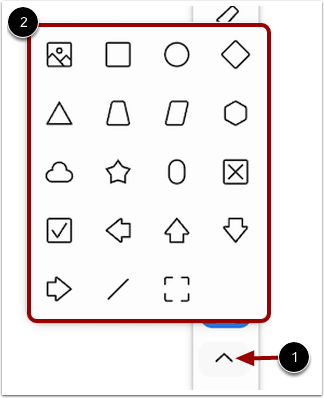
04:28: To create line annotations or shape annotations, click More. The
04:32: whiteboard tools includes line and shapes.
04:36: In the presentation, the poll results are a graph object, allowing you to move,
04:40: resize, annotate, and erase it with whiteboard tools.
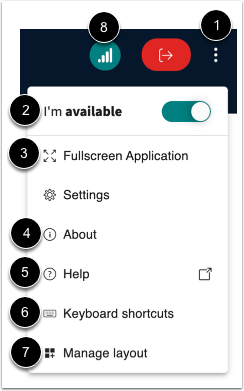
04:45: To open the Options menu, click the Options icon.
04:49: To indicate availability, click I'm available . When in
04:53: I'm away status, it toggles both your audio and webcam on or off
04:57: simultaneously.
04:59: To view the conference in fullscreen mode, click the Fullscreen Application.
05:04: To view information about the interface, click the About option.
05:09: To view help tutorials, click the Help link.
05:13: To view hotkeys, click the Keyboard shortcuts link.
05:17: To view presentation layout, click Manage layout.
05:21: To view your connection status, click the Connection status icon.
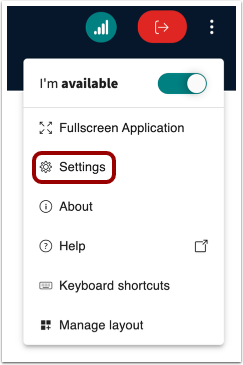
05:26: To open the Settings menu, click the Settings link.
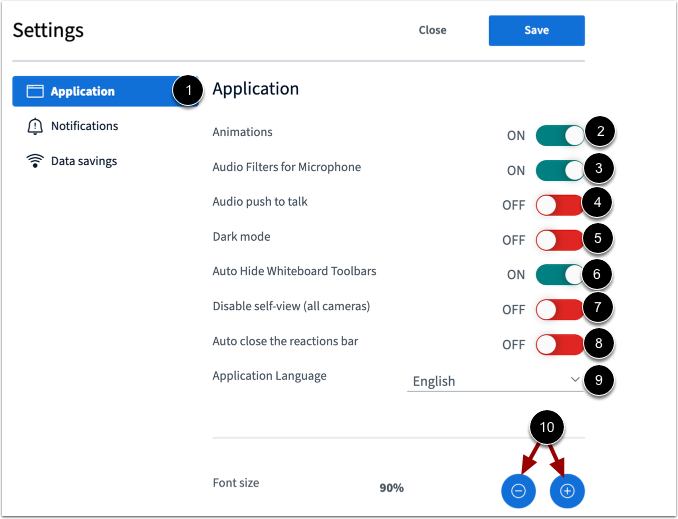
05:29: To manage applications settings, click the Application link. To manage
05:34: animations that display when a user is speaking,
05:36: click the Animations toggle. To manage microphone audio filters,
05:41: click the Audio Filters for Microphone
05:43: toggle.
05:45: To press a button to activate your microphone and speak,
05:47: click Audio push to talk toggle. To switch between light and dark
05:51: user interface, click Dark mode toggle..
05:55: To allow you to auto-hide the toolbar for a cleaner workspace, click Auto Hide Whiteboard
06:00: Toolbars toggle ..
06:02: To hide your own video feed while still keeping your camera on for others to see, click
06:06: Disable self-view (all cameras) toggle.
06:10: To manage excessive use of reactions set auto close, the reaction bar
06:14: toggle. After a reaction is shown
06:17: To select the language for the interface, click the application language, drop down
06:21: menu.
06:23: To adjust the font size, click the Decrease or Increase buttons.
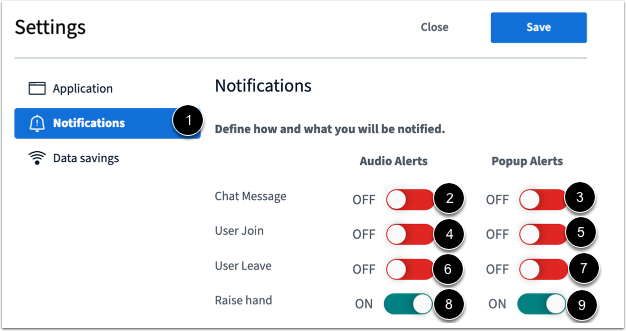
06:28: To manage notification settings, click the Notifications link.
06:33: To manage chat alerts, click the Chat Message Audio Alerts and Popup Alerts
06:37: toggles.
06:39: To manage user join alerts, click the User Join Audio Alerts and Popup
06:43: Alerts toggles.
06:45: To manage user leave alerts, click the User Leave Audio Alerts and Popup
06:50: Alerts toggles.
06:52: Lastly, to manage raised hand alerts, click the Raise hand Audio Alerts
06:56: and Popup Alerts toggles.
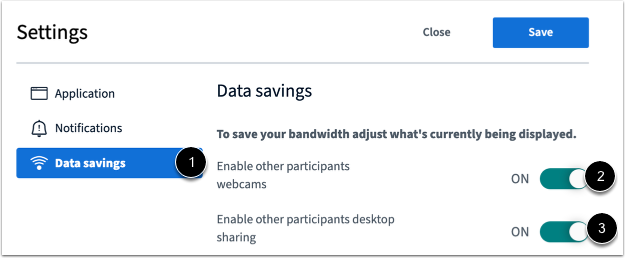
06:59: To manage data saving settings, click the Data savings link.
07:03: To enable or disable webcams, click the Enable other participants
07:08: webcams toggle.
07:10: To enable or disable desktop sharing,
07:12: click the Enable other participants desktop sharing toggle.
07:18: This guide covered how do I use the conferences interface as a moderator or
07:22: presenter.