As an admin, you can create developer API keys for root accounts. A developer API key is a code given to a third-party application developer that allows access to certain information and permissions within Canvas. Developer API keys can be used to create custom integrations with Canvas and allow third-party apps to use Canvas authentication. The developer API key uses OAuth2 to enable the application to use Canvas for authentication. For more information about OAuth2, see the Instructure API OAuth documentation.
The developer API key is sent from the application to Canvas when a user requests access. The application asks the user for permission to programmatically create an API access token. When the user authorizes the application, the third-party application will have the same access to information and account permissions as the user who granted access. For more information about developer documentation, see the Instructure Github page.
Key Scoping
Developer API Keys include functionality for key scoping as part of adding a developer API key. Key scoping allows you to control direct access to specific API endpoints for third-party tools.
Notes:
Open Account
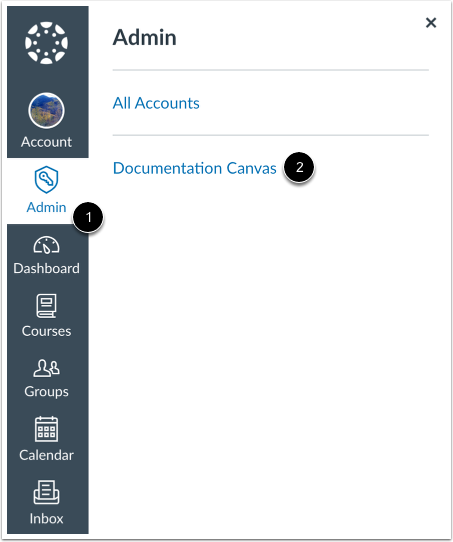
In Global Navigation, click the Admin link [1], then click the name of the account [2].
Open Developer Keys
In Account Navigation, click the Developer Keys link.
Add Developer Key
Click the Add Developer Key button.
Add API Key
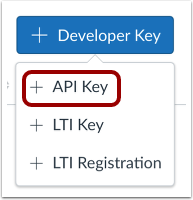
Click the Add API Key option.
Enter Key Settings
Enter the settings for the developer API key:
- Key Name [1]: Usually your app or company name. This field will be shown when users are asked to approve access to their Canvas account on your behalf.
- Owner Email [2]: The email of the person who owns the developer tool.
- Redirect URIs [3]: The domains where tokens are requested. These URIs are not your Canvas URL. To avoid mixed content browser concerns, use https.
- Linked Partner App [4]: When you add a redirect URI, Canvas checks for matching partner apps.
- If no matches are found, the UTID field stays blank.
- If one match is found, the UTID is automatically filled in.
- If multiple matches are found, you can choose the correct partner app from the dropdown; nothing is selected automatically.
- Vendor Code (LTI 2) [5]: A unique registered code which identifies the vendor or developer of the third-party tool. This is specifically for LTI 2 tools and apps.
- Icon URL [6]: The URL of the icon for your developer tool. This URL is presented to the user to approve authorization for your tool. To avoid mixed content browser concerns, use https.
- Notes [7]: Any notes about the developer key, such as the reason it was created.
- Test Cluster Only [8]: Creates a developer key that can only be used in the Canvas test environment.
- Client Credentials Audience [9]: Choose whether the credentials issued by the key will be presented to Canvas or to a peer service.
- Client Type [10]: Defines how the application proves its identity when requesting access tokens. Select one of the following options:
- Confidential (Default): For applications that run on a server the customer or partner controls and can store a client secret privately. This option supports most traditional server-side integrations. The Client Type field defaults to this status.
- Public: For applications that cannot safely store a secret, such as single-page apps and mobile apps. Public clients use Proof Key for Code Exchange (PKCE) instead of a client secret to verify their identity.
- Enforce Scopes [11]: Allows you to customize access for the key. Otherwise, the key will have access to all endpoints available to the authorizing user.
Notes:
- Integrations using the
urn:ietf:wg:oauth:2.0:oob redirect URI in the OAuth flow must explicitly add it to the Redirect URIs list on the developer key. - The client type cannot be changed after the key is created. Admins should select the option that matches how the application is built.
Save Key
Click the Save button.
View Key
View the Developer Key for your account. You can also manage existing developer keys.