Canvas Apps is the central hub to discover, manage, and monitor integrated apps. This feature aims to extend and enhance digital teaching and learning experience with powerful apps that provide and/or enrich content, assessment, multimedia, collaboration, analytics, accessibility, and more.
As a root account admin, you can manage LTI 1.3 tool availability and exceptions for a course or sub-account in Canvas Apps.
For more information about account permissions, visit our guide on how to set permissions for an account-level role.
Notes:
- When you copy a course with an exception, the exception will not copy. This is intentional to prevent users from gaining access to apps they should not have.
- If all courses in a sub-account should have access, it is recommended to create the exception at the sub-account level. This ensures that any new courses automatically inherit the exception.
- Some tools may show a history entry on January 23, 2026 under the name of the original installer. This was added automatically by our system to ensure the tools display properly with the new feature.
- Locking/unlocking the app ensures apps are deployed only in the intended accounts. Locking an app means it cannot be installed by copying the Client ID and pasting it on the old Apps page, either at an account or course level. You'll still be able to manage availability and exceptions via Canvas Apps when an app is locked
- If an LTI is already deployed to specific subaccounts or courses, it may still display at the root account for management. Root-level deployments are not yet supported when course-level deployments already exist. As a workaround, install the tool at the root account using the legacy By Client ID method. For detailed instructions, see How do I configure an external app for an account using a client ID?
- After installation, the root deployment appears in Availability & Exceptions. Set it to Not Available, then add exceptions for the subaccounts or courses where the tool should be enabled.
Open Account
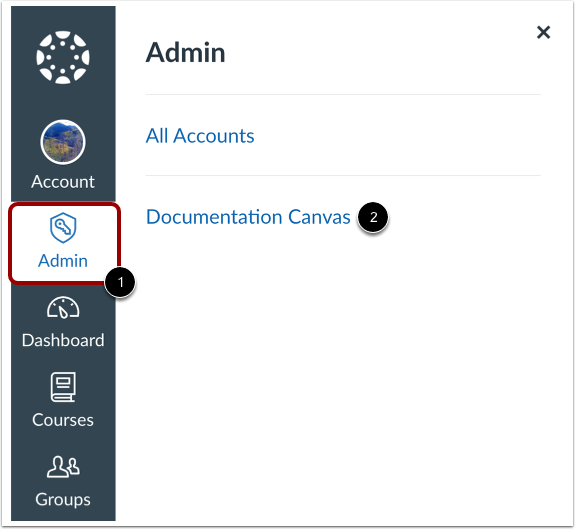
In Global Navigation, click the Admin link [1] and then click the name of the account [2].
Open Apps
In Account Navigation, click the Apps link.
View Manage Tab
Click the Manage tab [1]. A list of all LTI 1.3 configurations set up in your environment display.
To manage an existing app, click the app name [2].
To add a new app manually or by using Dynamic Registration, JSON, or JSON URL, click the Install a New App button [3].
Deploy App
If the app has not been deployed to any sub-accounts or courses, click the Create Deployment button.
Note: On the Availability and Exceptions tab, deployments are displayed in a consistent order: root deployments display first, followed by subaccount deployments, and course-level deployments last. This applies only to deployments and does not affect the ordering of exceptions. This helps users quickly understand deployment scope at a glance, reducing confusion across root, subaccount, and course-level deployments, and makes it faster to access and add availability and exceptions at the root level.
Manage App
You can copy the client ID [1], delete the app (if applicable) [2], or lock/unlock the app [3].
To set the app availability, click the Edit icon [4].
To add an exception, click the Add Exception button [5].
Set App Availability
Click the Availability drop-down menu [1] and select Available or Not Available [2]. To apply the changes, click the Save button [3].
Add Setting Exceptions
In the Add Availability and Exception modal, add a subaccount or course using the Search field [1] or the subaccounts and courses list [2]. Select availability [3] and click the Save button [4].
Edit Availability and Exception Settings
View the app availability for a course or sub-account [1]. To make changes, click the Edit icon [2]. To remove the exception, click the Delete icon [3].
View and Edit Configuration
To view the configuration settings, click the Configuration tab [1]. To edit the configuration, click the Edit button [2]. You can also edit the LTI configuration directly using a JSON format by clicking the Edit as JSON button [3]. To restore the default configuration, click the Restore Default button [4].
Note: Inherited LTIs cannot be edited.
View History
Click the History tab [1]. You can view when an update occurred [2], who updated it [3], and which fields were affected [4]. To view more details about the change, click the Availability & Exceptions link [5].