After you have created an account-level role, you can review the default permissions set by each account-level role. Permissions grant or deny access to specific features within an account and course and are applied to any user granted a specific account-level role. For more information, see on how to add an administrative user to an account.
Depending on the role, you may want to override the defaults to create custom permissions.
For more information about account permissions, view the Account Permissions resource document.
Notes:
- Some permissions may not be available for sub-accounts. To learn more about sub-account permissions and limitations, view the Account vs. Sub-Account Comparisons resource document.
- When you change a permission, it can sometimes take 30 minutes or longer for that permission to take effect. If the expected changes do not appear immediately, try again after some time has passed.
- Child consortium accounts inherit roles and permissions from the parent account. Child accounts can edit any unlocked roles and permissions.
- Sub-account admins can access the Apps page and Monitor tab to view data for their sub-accounts without needing Root Account admin permissions.
Open Account
In Global Navigation, click the Admin link [1], then click the name of the account [2].
Open Permissions
In Account Navigation, click the Permissions link.
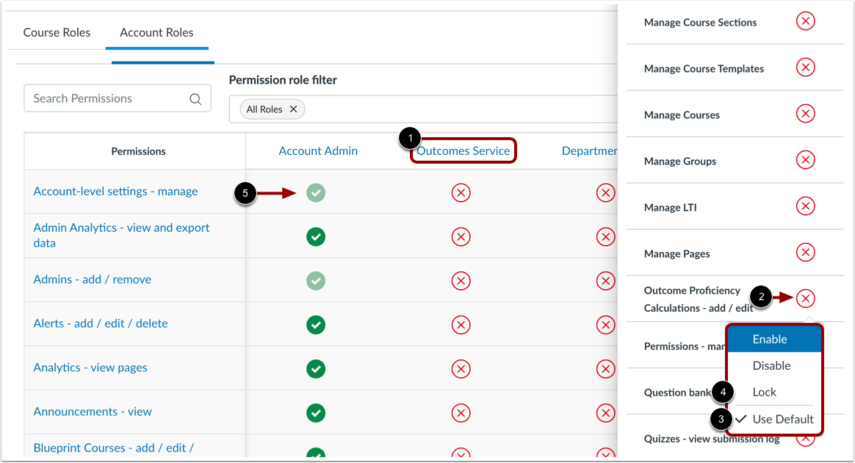
Open Account Roles
Click the Account Roles tab.
Manage Permissions
To override any permissions, locate and click the name of the user role [1]. Click the icon next to the name of a permission [2]. In the permission menu, the existing permission is indicated by a checkmark [3].
Choose the new permission status by clicking one of the permission options: Enable or Disable. After you enable or disable the permission, you can choose to lock the permission status. Click the Lock option to lock the permission status [4]. Locked options keep the setting from being changed by subaccount admins in a lower account. The new permission status is saved automatically.
Note: If a permission icon does not display as opaque, you cannot change the permission [5].
View Grouped Permissions
Some permissions may be grouped together to allow for greater granularity and control over permissions.
Grouped permissions list the grouped permissions below the grouped permission name [1].
To expand grouped permissions, click the expand icon [2].
Manage Grouped Permissions
You can manage each granular permission within the group with the corresponding checkboxes. To enable or disable a granular permission, click the checkbox [1]. A checked box indicates the permission is enabled [2]. An unchecked box indicates the permission is disabled [3].
If all permissions are enabled for a user role, the permission group displays a checkmark icon [4].
If some permissions are enabled and some are disabled for a user role, the permission group displays a half-filled icon [5].
If all permissions are disabled for a user role, the permission group displays an X icon [6].
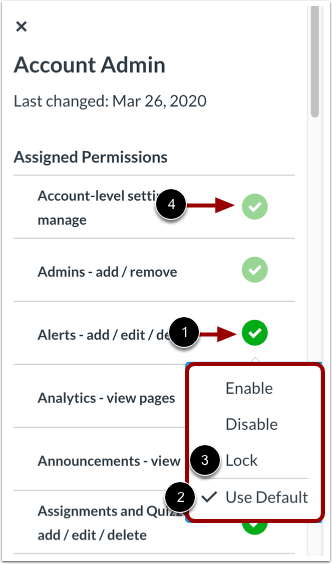
View User Role Permissions
To view permissions for an individual user role, click the role name [1].
In the sidebar, you can view the role name [2], the time or date that permissions for the user role were last changed [3], and the user's assigned and unassigned permissions [4].
Manage User Role Permissions
To manage user permissions from the sidebar, Click the icon next to the name of a permission [1]. In the permission menu [2], the existing permission is indicated by a check mark.
Choose the new permission status by clicking one of the permission options: Enable or Disable. After you enable or disable the permission, you can choose to lock the permission status. Click the Lock option to lock the permission status [3]. Locked options keep the setting from being changed by subaccount admins in a lower account. The new permission status is saved automatically.
Note: If a permission icon does not display as opaque, you cannot change the permission [4].
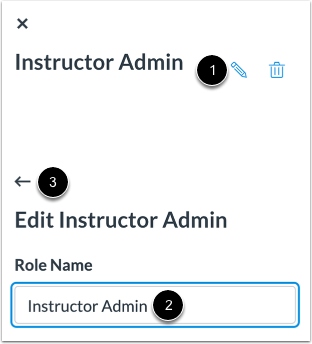
Edit User Role
To edit the name of the user role, click the Edit icon [1]. Edit the name of the user role [2], then click the Back arrow [3].
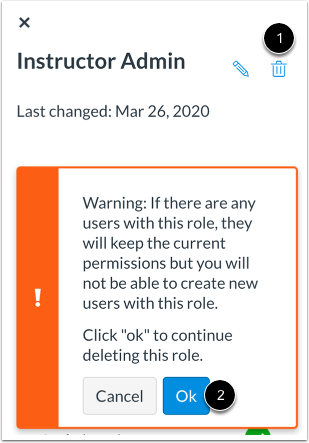
Delete User Role
To delete a user role, click the Delete icon [1]. Review the warning about user roles—any users with the role you are deleting will keep the current permissions, but no new users can be created with the user role.
Deleting a user role cannot be undone.
To confirm deletion of the user role, click the Ok button.
Manage Sub-Account and Monitor Access
As the root admin, you must enable the LTI Registrations - Manage permission for the role or roles assigned to sub-account admins. This gives users with access to LTI usage the ability to monitor activity directly, reducing the need to contact a Root Account admin.
Notes:
- Sub-account admins should contact a Root Account administrator to complete the steps outlined above.
- Sub-account admins can access the Apps link in the account navigation within their sub-account. They have access only to LTI usage information for the sub-account they are in and any child sub-accounts.
- Root Admins can restrict sub-account admin access to the Monitor tab by disabling the LTI Registrations Manage permission.