As an administrator, you can configure which columns appear in which order in the Management > Products table. To do this, you can either show or hide existing system columns or create custom columns based on your existing tags and tag groups.
This allows you to manage more details from the list view of the products as well as highlight the information that is important to your organization.
Note: To manage columns, you need to have an Organization Administrator role.
View System Columns
The platform comes with several out-of-the-box system columns that are available but may or may not be visible until you configure them. These provide special functionality that can be configured on a per product basis.
- Product Name (Fixed): displays the name and logo of the tool. This is the only column that cannot be hidden or moved.
- PPL Visibility: only visible when the Public Product Library (PPL) is configured. The toggle displays visibility according to the configured status rules along with an option to override.
- Status: displays the Approval Status as configured in the Product Details screen. You can configure custom statuses in Settings.
- Privacy Status: displays the Privacy Status as configured in the Product Details screen. You can configure custom statuses in Settings.
- Price: displays the per affected student per year cost as configured in the Product Details cost calculator.
- Contract End Date: displays the contract end date as configured in the Product Details. This date is also optionally visible in the Public Product Library (PPL).
- Our Educators: displays the average overall grade as evaluated by members of your organization.
- Community: displays the average overall grade as evaluated by all members of LearnCommunity.
- Pin in Library: a toggle that enables making selected products appear first in the order of products presented in the organization library.
- Resources: displays a count of attached resources. Resources of types text, document, link and form can be attached to products in the Product Details page.
- Grade Level: default collection of Grade Level tags.
- LearnCommunity Product State: displays if a product is either Published or Retired in the LearnPlatform Community
- Organizational Library Product State: displays if the product is either Active or Archived. The default view only shows active products. You can also check if a product is active or archived when you hover over an entry.
- Company Name: displays the Vendor Company name that owns/makes the product.
Open Product Management
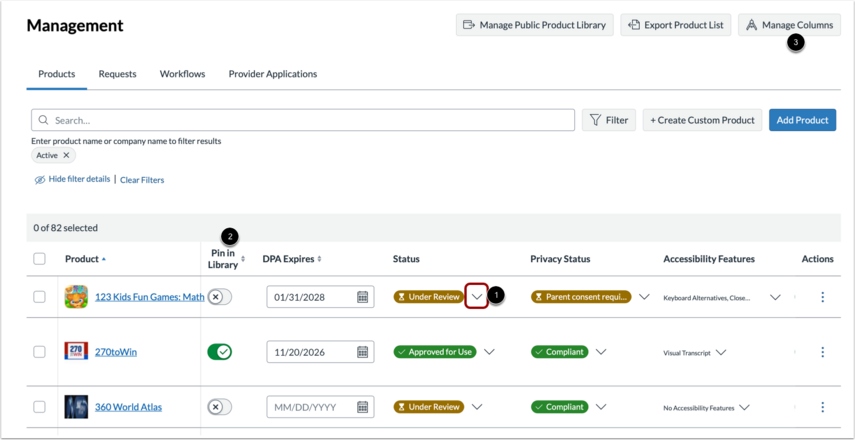
To configure columns, click the Management drop-down menu [1] and then select the Products link [2].
Click the Columns icon [3].
Open Columns
To manage which columns display in the product table, click the Manage Columns button [2].
Enable or Disable Columns
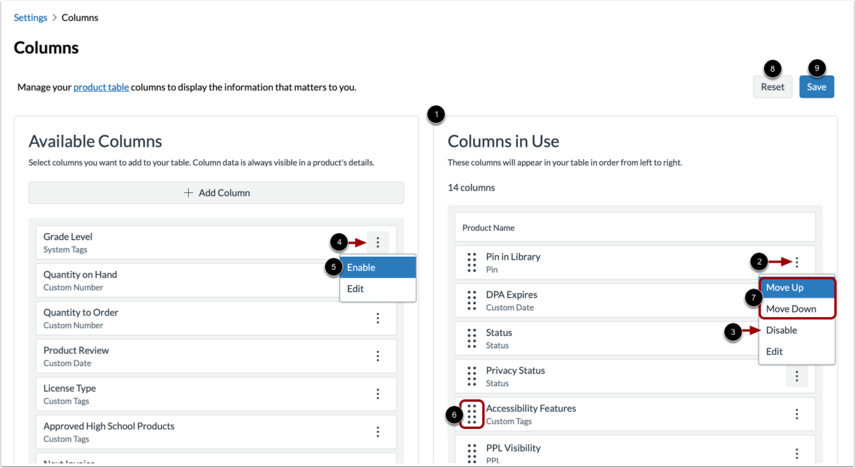
Columns that currently display in the table are listed in the Columns in Use area [1].
To remove a column from the table, click the column's Option icon [2] and select the Disable link [3]. The column moves to the Available Columns area.
To add a column to the table, click the column's Option icon [4] and select the Enable link [5]. The column name moves to the Columns in Use area.
To change column order, click a column control handle [6], and drag the column to a new location in the list. Alternatively, you can click the the column's Option icon and select the Move Up or Move Down links [7].
To undo changes, click the Reset button [8]. To update the table on the Management page, click the Save button [9].
Add or Edit Column Data
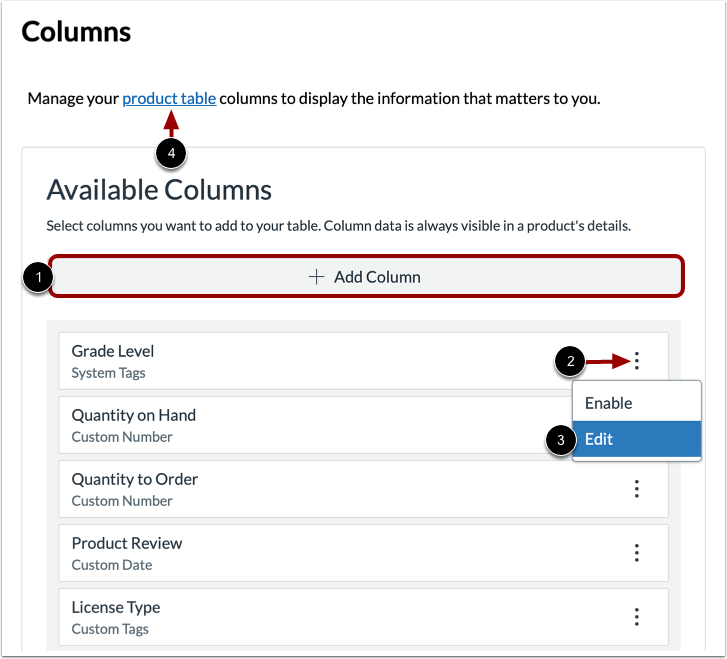
To add custom data columns, click the Add Column button [1].
To edit column names or related data, click the column's Options icon [2] and select the Edit link [3].
To return to the product list table, click the product table link [4].
Add Column
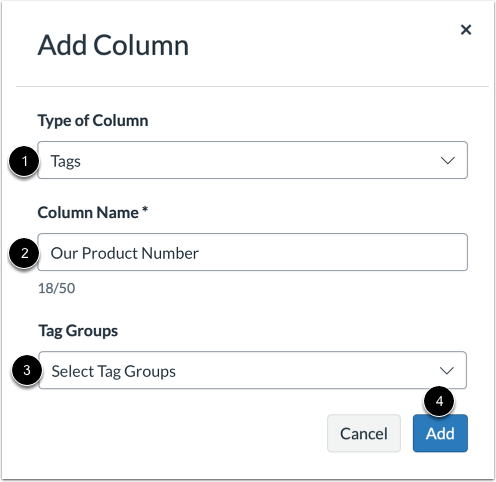
If you click the Add Column button, the Add Column window displays. To add a column, click the Type of Column drop-down menu [1]. Select a type option to base the data on a tag or a number, price, date, or text.
Enter a column name in the Column Name field [2].
Depending on the type of column you are adding, you may need to also click a drop-down menu to select a tag group, a number format, or a date format [3].
To create the column, click the Add button [4].
View Custom Column Types
You can view your custom columns in the Management page.
You can create a column with a drop-down menu of tags to easily associate tags with products in your library [1].
To view the tags, locate the product and click the drop-down menu [2].
Notes:
- Tag groups display in the column in the order they are selected. Additionally, the tags within the groups will be in the order and indentation level as defined in the tag group.
- Single Select tag groups cannot be added in combination with any other tag group in a column. Many multi-select groups can be combined in one column.
- Tags applied to products follow the visibility settings assigned to them.
Number
You can enter and display numbers of interest: number of license, hardware quantities, or PO numbers [1].
To add or edit a number, click the Edit icon [2] or click the number field [3].
Price
The Price column configuration supports the entry of costs at the whole dollar or with dollars and cents [1]. You may use this to track license costs, annual costs, contract costs, or per-students.
To add or edit a price, click the Edit icon [2] or click the number field [3].
Date
The Date column configuration supports the entry of dates. You can use this to contract expiration dates, last review dates, or DPA/Exhibit E expirations.
Text
In a Text column configuration, you can write up to 200 characters and attach them to products at the list and detail levels [1]. Ideas for this field could be short updates about in-process work, exceptions and/or additional context, or questions & clarifications.
To add or edit text, click the Edit icon [2] or the text field [3].
Note: Information contained in custom columns are only visible to LearnPlatform admins, except for tags that are applied and set to be visible in the Organizational or Public Product Library.