As a Catalog admin, you can add subcatalogs in Canvas Catalog by creating a new catalog. Your domain catalog links your account in Canvas with your catalog home page and is created for you as part of the catalog setup process. Subcatalogs are linked to your domain catalog and allow you to associate specific listings for a department, organization, or team. Subcatalogs can be customized with their own branding and settings.
By default, subcatalog listings are shown in the parent catalog as well as the subcatalog's individual URL path. However, subcatalogs can also be made private, where subcatalog listings are not shown in the parent catalog.
Once you have created a subcatalog, you can manage your catalogs at any time to add customization options.
Note: You cannot delete a subcatalog once it has been created.
Open Admin
Click the usernamedrop-down menu [1]. Then, click the Admin link [2].
Open Catalogs
Click the Catalogs tab.
Add Catalog
Click the Add Catalog button.
Select URL Type
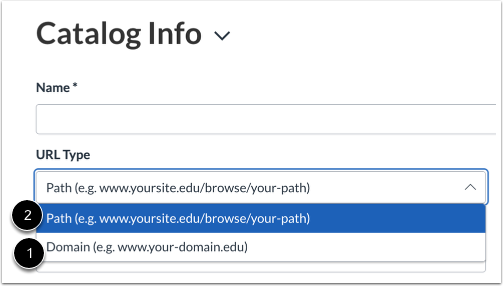
Select the type of URL for the subcatalog in the URL Type drop-down menu.
To create a subcatalog using a domain-type URL, select the Domain option [1]. Only subcatalogs set up with a domain-type URL can be associated with a payment gateway.
To create a subcatalog using a path-type URL, select the Path option [2].
Add Name and Path URL
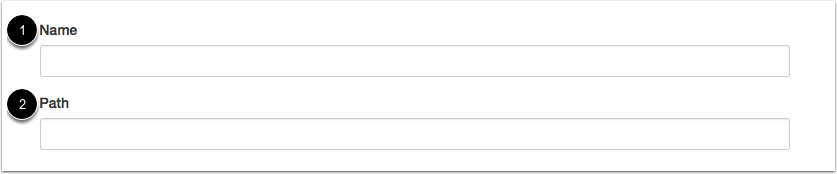
Add a name [1] and path [2] for your subaccount.
Name is how you want to refer to the subcatalog. The account name will appear in filters if the subcatalog is used as a category.
Path is the name extension for the subcatalog; this name will be added to the end of yoursite.edu/browse/. The path should be unique per subcatalog. Use dashes between word spaces (e.g. yoursite.edu/browse/your-path-here).
Note: If you are adding a subcatalog using a domain-type URL, Canvas Catalog displays a Domain field instead of a Path field. Capital letters are not supported in domain names.
View Path Example
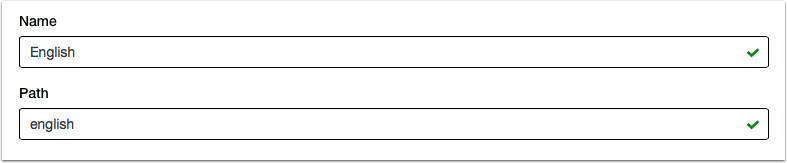
As an example of a subcatalog path, if you wanted to create a subcatalog for an English department, you could specify the path as english. Any associated listings would be seen on the subcatalog page at yoursite.edu/browse/english.
Select Parent Catalog
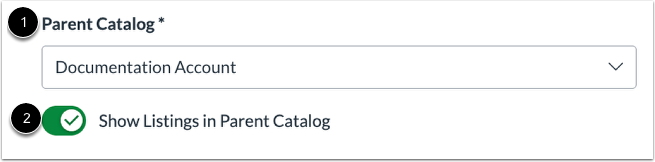
In the Parent Catalog drop-down menu [1],select the catalog where you want to associate the path URL. Most commonly, the domain catalog account is the parent catalog. However, another subcatalog can also be a parent catalog.
By default, all subcatalog listings are enabled to be shown in the parent catalog. To create a private subcatalog and hide listings in the parent catalog, click the Show Listings in Parent Catalog toggle button off [2].
Add Payment Details
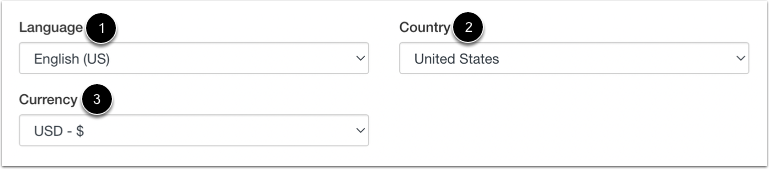
Whether or not your subcatalog accepts payments, you must set the language [1], country [2], and currency [3] for your subcatalog.
- Languageis the language for your Catalog users. The default option is English. Learn more about Catalog's supported languages. Some languages are not fully translated and may fall back to a related language or the English default.
- Currencyis the system of money you want to use for paid courses. The default option is USD-$.
- Countryis the country code for the country where your Catalog account resides. The default option is the United States.
View Default Instructor Label Field
By default, the Instructor Label field is titled Instructor.
View Customized Instructor Label
You can customize the Instructor Label field with alternative titles such as Facilitator, Teacher, or any preferred term.
View Inherit Parent Settings Toggle
If Inherit Parent Setting is not explicitly defined for a subcatalog, it will inherit the setting from the parent catalog.
Add About Details
In the About field, enter a short description about the catalog. This field does not display anywhere else in catalog, but it can help differentiate similar catalog accounts.
Enable Subcatalog Restrictions
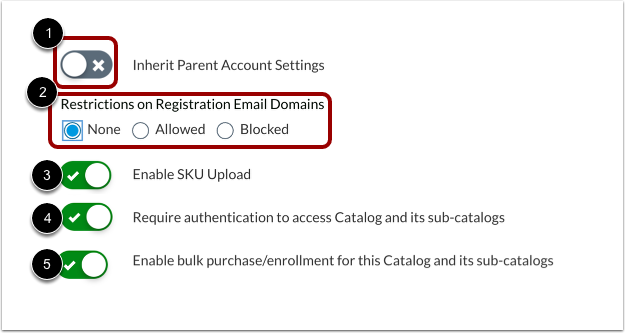
By default, the catalog inherits parent account settings. To allow settings unique to the subcatalog, click the Inherit Parent Account Settings toggle off [1].
When Inherit Parent Account Settings is off, you can manage registration from email domains for the subcatalog [2].
By default, adding SKUs manually is not allowed. To enable SKU uploads in the subcatalog, click the Enable SKU Upload toggle button on [3].
By default, authentication to access the catalog and its subcatalogs is not required. To require authentication, click the Require authentication to access Catalog and its sub-catalogs toggle button on [4].
By default, bulk purchasing and bulk enrollment for the catalog and its subcatalogs is not allowed. To allow bulk purchase/enrollment, click the Enable bulk purchase/enrollment for this Catalog and its sub-catalogs toggle button on [5].
Save Subcatalog
Click the Save button. Confirm your catalog was added successfully.
Note: Catalog will notify you if there are errors in your catalog account. If there are any errors, correct them and then click the Save button again.